sábado, 22 de agosto de 2020

ASTROMECHANICS Automatic Review (English)

Hi,

I am looking at one of the essential accessories for astrophotographers using cooled CCD cameras with Canon EF lenses. The manufacturer is ASTROMECHANICS (www.astromechanics.org) its main product are adapters that are mechanically and electronically coupled to the photographic objective, being also ASCOM compatible, which allows automating the focus using the focusing mechanism that the objective already has .

In short, a very useful accessory for anyone who wants to have an autofocuser in a CCD camera setup attached to a photographic lens.                                       

So far there are adapters for the manufacturers ZWO, QHY, SBIG, FLI, QSI and MORAVIAN
Tested for a wide range of Canon and third-party lenses . The mechanism of the adapter is simple and ingenious, it has in each case the exact backfocus for the CCD, on the one hand, the Canon bayonet connection (for the lens) and on the other the thread corresponding to the CCD model, having within this the Electronics required for ASCOM to IRIS interface (Canon protocol).

UNPACKING AND INSTALLATION

From Russia it arrived perfectly packaged, micro USB to USB connection cable and adapter, instructions are on their website.

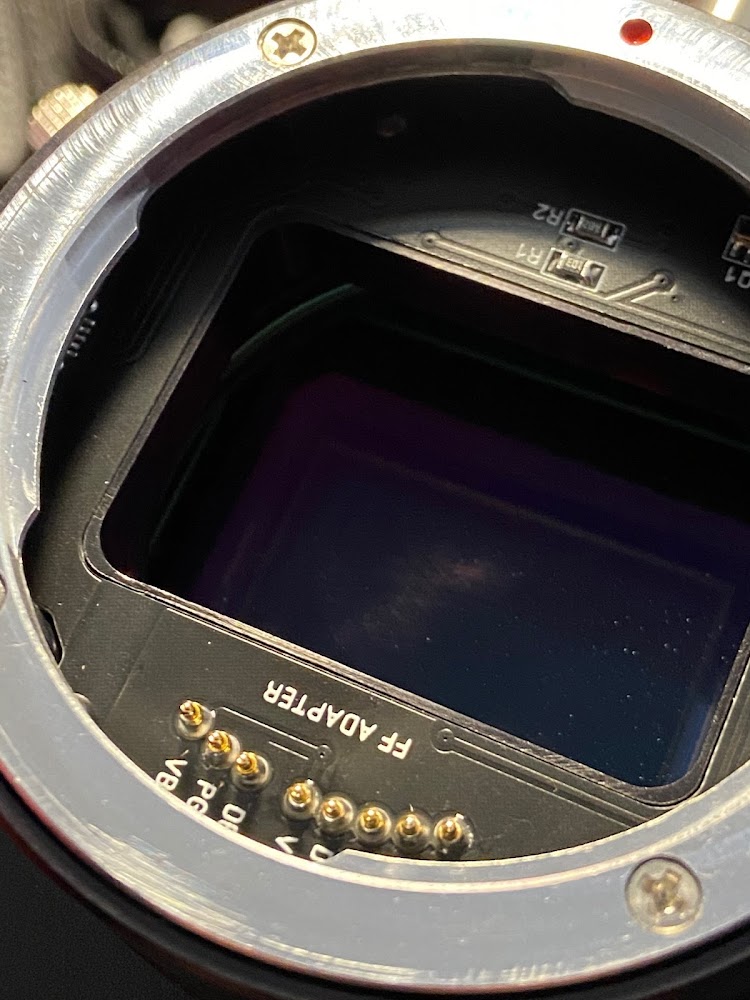
The first impression is of a high quality product, metal construction and very professional electronics. On the side of the barrel is the micro USB connector for connection to the computer. Also note the contacts in which the lens engages when screwed into the bayonet.

On the one hand, it is screwed to the camera and on the other hand, the lens is attached exactly like a Canon camera.

CANON BAYONET SIDE VIEW WHERE THE LENS IS ATTACHED


THREAD SIDE WHERE THE CAMERA IS ATTACHED

In addition, it has an internal thread in which you can install any 2 "filter (M48). In the photo you can see an IV / IR filter installed

CONNECTOR COUPLED TO CAMERA

CONNECTED TO THE CAMERA (QHY)

SET INSTALLED CAMERA AND LENS

USB CABLE CONNECTOR TO MICRO USB PORT

The documentation and software can be downloaded , the software has the ASCOM compatible driver that allows the control of up to 2 Astromechanics focusers and also a software that allows you to control the focuser if you do not want to use ASCOM

TESTS

 Using the No Ascom driver As you can see, in the configuration A of the driver it is possible to identify the COM port of connection of the focuser, to identify the model of the photographic lens and the desired focal ratio (F).


We press START and it should connect. The same driver allows to move in preset jumps, although logically it can be controlled through the ASCOM interface of the capture software used.


CIt should be noted that, if the objective used is not in the list of objectives, it can be configured and parameterized. In the documentation it is widely documented.

The lens must be set to the autofocus option and it is also important to know that when the focuser is connected, its position value defaults to the 5000 position.

                    FINAL INSTALLATION CANON 200MM F2.8 LENS AND QHY 367C CAMERA
 

The already real tests in a night of photographic shooting the realization of the focus curve with the MAXIM DL which were very acceptable, allowing to find the focus very precisely.

 Being ASCOM standard, it works in any capture software: Maxim, SGP, APT, NINA, ...

 As you can see, automating the focus by creating the "V" characteristic is feasible, precise and accurate.


CONCLUSIONS

Very useful adapter, I would say essential for amateurs who use CCD cameras and Canon lenses or similar. Excellent build quality and perfect focus reliability.

 PROS
  • Construction, mechanical and electronic quality.
  • Smooth coupling to the CCD camera and lens.
  • Reliability and predictability in focus, without strange behavior.
  • ASCOM interface, usable in any compatible capture program.
  • Possibility of installing a 2 "filter (Ha, anti-pollution, ...).
  • Possibility of parameterizing objectives that are not in the default list.
  • Precision in focus. It does not depend on the location of bright stars or LIVEVIEW.
  • Price contained, on the order of € 230 including shipping
IMPROVEMENTS
  • Not very intuitive in the first use, some kind of help or information in the driver and software.
  • Develop a software tool to focus with manual objectives.
  • Automate manual targets
  • Rotator adapter, so that the adapter and camera can be rotated to adjust framing angle.
Highly recommended product.

jueves, 20 de agosto de 2020

Analisis Enfocador Automático ASTROMECHANICS

Hola a todos, 

En esta ocasión analizo uno de los accesorios imprescindibles para los astrofotógrafos que utilizan cámaras CCD refrigeradas con objeticos EF de Canon. El fabricante es ASTROMECHANICS (astromechanics.org) su principal producto son adaptadores que se acoplan mecánicamente y electrónicamente al objetivo fotográfico, siendo además compatible ASCOM, lo que permite automatiza el enfoque utilizando el mecanismo de enfoque que ya tiene el objetivo.

En resumen, un accesorio muy útil para quien quiera tener un enfocador automático en una configuración de cámara CCD acoplada a un objetivo fotográfico.

Hasta el momento hay adaptadores para los fabricantes ZWO, QHY, SBIG, FLI, QSI y MORAVIAN. Testado para una gama amplia de objetivos Canon y otros fabricantes. El mecanismo del adaptador es simple e ingenioso, tiene en cada caso el backfocus exacto para la CCD, por un lado, la conexión bayoneta Canon (para el objetivo) y por la otra la rosca correspondiente al modelo de CCD, teniendo dentro de este la electrónica necesaria para la interfaz ASCOM a IRIS (protocolo Canon).

DESEMPAQUETADO E INSTALACION

Procedente de Rusia llegó perfectamente embalado, cable de conexión micro USB a USB y el adaptador, las instrucciones están en su página web. El adaptador pedido fue la version M54 que es la rosca para la CCD que utilicé.

La primera impresión es de un producto de gran calidad, construcción metálica y electrónica muy profesional. En el lateral del barrilete se sitúa el conector micro USB para conexión al ordenador. También se observa los contactos en los cuales el objetivo se acopla cuando se rosca a la bayoneta.

Por una parte, se rosca a la cámara y por otra parte se acola el objetivo exactamente igual que a una cámara Canon.


VISTA LADO BAYONETA CANON DONDE SE ACOPLA EL OBJETIVO


LADO ROSCA DONDE SE ACOPLA LA CAMARA

Además, posee una rosca interior en la cual puedes instalar cualquier filtro de 2" (M48), En la fotografía se ve instalado un filtro IV/IR

CONECTOR ACOPLADO A LA CAMARA

BAYONETA DEL OBJETIVO

CONJUNTO INSTALADO CAMARA Y OBJETIVO

CABLE USB CONECTADOR AL PUERTO MICRO USB

La documentación y software se puede descargar, el software dispone del driver compatible ASCOM que permite el control de hasta 2 enfocadores Astromechanics y también un software que permite controlar el enfocador si no se quiere usar ASCOM. También tiene el controlador para INDI.

PRUEBAS

Utilizando el driver No Ascom Como se puede ver, en la configuración A del driver permite identificar el puerto COM de conexión del enfocador, identificar el modelo del objetivo fotográfico y la relación focal (F) deseada.


Pulsamos START y debiera conectarse. El mismo driver permite mover en saltos prefijados, aunque lógicamente se puede controlar mediante la interface ASCOM DEL software de captura que se utilice


Cabe resaltar que, si el objetivo utilizado no está en la lista de objetivos, se puede configurar y parametrizar. En la documentación esta ampliamente documentada.

El objetivo debe ponerse en la opción autoenfoque y es importante también conocer que cuando se conecta el enfocador, su valor de posición se pone por defecto en la posición 5000.

INSTALACION FINAL OBJETIVO CANON 200MM F2.8 Y CAMARA QHY 367C
 

Las pruebas ya reales en una noche de tomas fotográficas la realización de la curva de enfoque con el MAXIM DL las cuales fueron muy aceptables, permitiendo encontrar el foco de manera muy precisa.

 Al ser estándar ASCOM funciona en cualquier software de captura: Maxim, SGP, APT, NINA,...

 Como se puede ver, la automatización del foco mediante la creación de la característica "V" es viable, precisa y certera.


Fotografía final utilizando el enfocador ASTROMECHANICS, Cámara 367C y objetivo Can 50mm 1.8 ST (@2,8).

Resultado estrella puntuales correspondientes a un buen enfoque en un objetivo muy difícil de enfocar a mano, por sus 50mm y por la baja relación focal.


CONCLUSIONES

Adaptador muy útil, yo diría que imprescindible para aficionados que utilicen cámaras CCD y objetivos Canon o similares. Una calidad de construcción excelente y una fiabilidad en el enfoque perfecta.

 PROS

  • Calidad construcción, mecánica y electrónica.
  • Suavidad de acople a la cámara CCD y a objetivo.
  • fiabilidad y predictibilidad en el enfoque, sin comportamiento extraños.
  • Interface ASCOM, utilizable en cualquier programa de captura compatible.
  • Posibilidad de instalación de filtro de 2" ( Ha, anticontaminación, ...).
  • Posibilidad de parametrizar objetivos que no estén en la lista por defecto.
  • Precisión en el enfoque. que no depende de localización de estrellas brillantes ni del LIVEVIEW.
  • Precio contenido, del orden de 230€ con envío incluido

MEJORAS

  • Poco intuitivo en el primer uso, algún tipo de ayuda o información en el driver y software.
  • Desarrollar una herramienta software para enfoque con objetivos manuales.
  • Automatizar objetivos manuales
  • Adaptador con rotador, de forma que pueda girarse adaptador y cámara para ajustar Angulo de encuadre.

Producto altamente recomendable.

martes, 18 de agosto de 2020

PIXINSIGHT TUTORIAL: Elimination of Bright Star Halos (English)

Author:  Rafael Rodríguez Morales              Level: Advanced

Hello again, this time and within the tutorials on processing astronomical photographs with PixInSight I present this tutorial that explains the processing to eliminate halos in very bright stars. This effect or optical aberration is normally caused by the optical train (filters, reducers,), leaving the only option to eliminate or reduce it in the processing phase of the final photograph. The method that I present here I have developed and complemented based on ideas , being the original method, being quite practical, simple and effective.

The PixelMath tool will be used  as the main tool, which allows to materialize mathematical calculations with each pixel of a photograph 

The object is to create a mask that perfectly covers the circle of the halo, for this we will use the mathematical formula of the circle:

iif (sqrt ((x-CX) ^ 2 + (y-CY) ^ 2) <R, 1,0

Conditional formula ( iff ) that has 3 constants to be defined manually and that defines the size and position of the circle within the frame of the photograph .:

 R = Radius of the circle

CX = Center of the circle, X coordinate

CY = Center of circle, Y coordinate

We will use the attached image, in which a large halo is observed around the star Antares.


We calculate the position of the center of Antares, for this we use the Dynamiccrop tool  . The coordinates start in the upper left corner, we can know that the center of Antares is at the coordinate X = 1840, Y = 2336 approximately.

In the same way we can know the approximate radius of the circle, R = 863.


Defining the parameters and formula in PixelMath (in this case we define R = 1000 to see it better).


Applying PixelMath we create the mask that we apply to the photograph.


Near vision and the position of the mask in relation to the halo. You will need fine adjustments to the position and radius of the circle. You can try on and create the necessary masks until you see that it fits the halo.

Once set it is convenient feather the circle  ut ilizando  MultiscaleLinearTransform.


Applying the mask and blurring the edge as precisely as possible, we use  CurveTransformation to reduce the transition of the edge of the halo. We cancel layers 1 to 6.


.


Final version.

And this is it ... Thank you

email:  rrodrigum@gmail.com


domingo, 16 de agosto de 2020

TUTORIAL PIXINSIGHT: Eliminacion de Halos de Estrellas Brillantes

Autor: Rafael Rodríguez Morales              Nivel: Avanzado

Hola de nuevo, en esta ocasión y dentro de los tutoriales sobre procesado de fotografías astronómicas con PixInSight presento este tutorial que explica el procesado para eliminar los halos en estrellas muy brillantes. Este efecto o aberración óptica son causados normalmente por el tren óptico (filtros, reductores,), quedando como única opción eliminarlo o reducirlo en la fase de procesado de la fotografía final.El método que aquí presento lo he desarrollado y complementado en base a ideas, siendo el método original, siendo bastante práctico, sencillo y efectivo.

Se utilizar la herramienta PixelMath como herramienta principal, que permite materializar cálculos matemáticos con cada pixel de una fotografía 

El objeto es crear una máscara que cubra perfectamente el circulo del halo, para ello utilizaremos la formula matemática del circulo:

iif(sqrt((x-CX)^2 + (y-CY)^2) < R, 1,0

Formula condicionada (iff) que posee 3 constantes a definir manualmente y que define el tamaño y posición del circulo dentro del marco de la fotografía.:

 R= Radio del circulo

CX= Centro del circulo, coordenada X

CY= Centro del circulo, coordenada Y

Utilizaremos la imagen adjuntada, en la cual se observa un gran halo alrededor de la estrella Antares.

Calculamos la posición del centro de Antares, para ello utilizamos la herramienta Dynamiccrop. Las coordenadas empiezan en la esquina superior izquierda, podemos conocer que el centro de Antares está en la coordenada X=1740, Y=2336 aproximadamente..


De igual forma podemos conocer el radio aproximado del circulo, R=863.


Definiendo los parámetros y formula en PixelMath (en este caso definimos R=1000 para verlo mejor).


Aplicando PixelMath creamos la máscara que se la aplicamos a la fotografía..


Visión de cerca y la posición de la máscara respecto al halo. Necesitará ajustes finos en la posición y en el radio del circulo. Se puede probar y crear las máscaras necesarias hasta que se vea que se ajusta al halo.

Una vez ajustada es conveniente difuminar el borde del circulo utilizando MultiscaleLinerTransform


Aplicada la máscara y difuminado el borde lo más preciso posible,utilizamos CurveTransformation para reducir la transición del borde del halo.Anulamos las capas 1 a la 6.

Podemos probar cada canal RGB si es necesario sin distorsionar los colores manteniendo las transiciones dentro fuera del halo de forma suave y que haya desaparecido el halo.

 .

Resultado final.

 Y esto es todo... Gracias

email:  rrodrigum@gmail.com